Adding phone numbers, emails and addresses
In short: On the donor's profile, use + Phone, + E-mail or + Address in the Contact Information panel to add a detail, choose a label, and tick Set as default if it should be the main one. You need the Manage Donors permission. The default email receives certificates and messages; the default address prints on Section 18A certificates.
Overview
A donor can have several phone numbers, several email addresses and several postal addresses. ActiveDonor uses the donor's default email to send certificates and messages, and the default address on Section 18A certificates. This article explains how to add, edit, label and remove each, and how "default" works.
Before you start
You'll need:
- The Manage Donors permission.
- The donor's profile open — these details live in the Contact Information panel on the left of the profile.
📌 Note: The first phone, email or address you add for a donor automatically becomes the default for that type. You can change the default later.
Adding a phone number
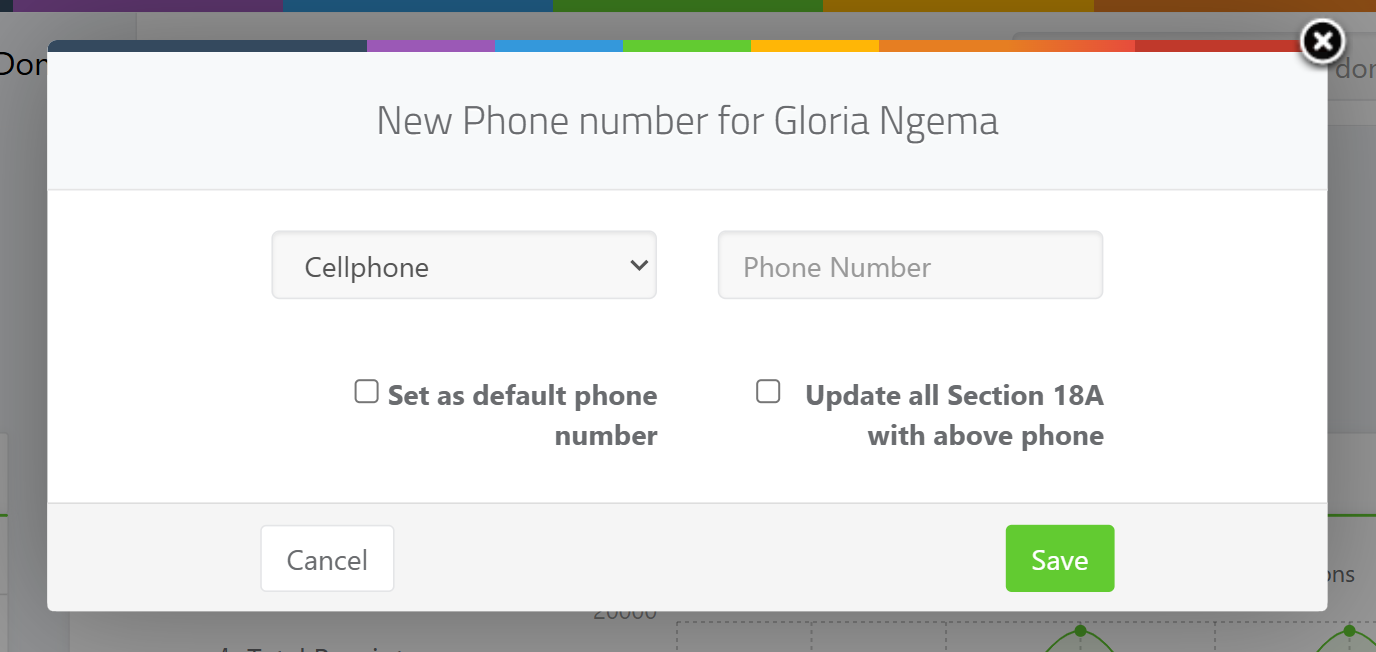
Step 1: Open the add-phone window
In the Contact Information panel, click + Phone.
Step 2: Enter the number and choose a label
Type the number and pick a label. The available phone labels are: Cellphone, Landline, Home, Work, Fax and Other.
Step 3: Use the right format
Enter a South African number as 0XXXXXXXXX — a zero followed by nine digits, with no spaces. A wrong format shows "Phone format should be 0XXXXXXXXX".
Step 4: Set default / update certificates (optional)
Tick Set as default phone number if this should be the donor's main number. If the donor has Section 18A certificates, tick Update all Section 18A with above phone to copy the number onto them.
Step 5: Save
Click Save. A Cellphone-labelled number that starts with 0 or + shows a WhatsApp shortcut on the profile.
Adding an email address
Step 1: Open the add-email window
In the Contact Information panel, click + E-mail.
Step 2: Enter the address and choose a label
Type the address and pick a label. The available email labels are: Email, Work Email, Personal Email, Family Email, Secondary Email and Other Email. The address must be a valid, real email.
Step 3: Set default (optional) and save
Tick Set as default e-mail address if this should be the donor's main email — ActiveDonor sends certificates and messages to the default email. Optionally tick Update all Section 18A with above email. Click Save.
Adding a postal address
Step 1: Open the add-address window
In the Contact Information panel, click + Address.
Step 2: Fill in the address
Enter Address Line 1, Address Line 2, Address Line 3, City / Suburb, Province, Post Code and Country.
Step 3: Label, set default, save
Choose an address label — the options are Address, Home, Work, Office and Other. Tick Set as default address if it should be the main address, and optionally Update all Section 18A with above address. Click Save.
Editing or removing a detail
Each phone, email and address in the Contact Information panel has a pencil icon next to it. Click it to open the edit window, where you can change the value or label, set it as the default, or Delete it.
How "default" works
- The default phone, email and address are the ones ActiveDonor uses first. The default email receives emailed certificates and messages; the default address prints on Section 18A certificates.
- The first item of each type is set as the default automatically. To change it, edit another item and tick Set as default.
- If you delete the default and others remain, the next item becomes the default automatically.
Updating Section 18A certificates
When you change a phone, email, address or tax detail, existing Section 18A certificates keep the details they were issued with. The edit windows offer an option to Update all Section 18A with above…, which clears and regenerates the affected certificate so it carries the latest details. You can also use the Update All Certificates with latest info button on the donor's Section 18A tab.
Field reference
| Detail | Labels available | Validation |
|---|---|---|
| Phone | Cellphone, Landline, Home, Work, Fax, Other | SA format 0XXXXXXXXX (zero + 9 digits, no spaces). |
| Email, Work Email, Personal Email, Family Email, Secondary Email, Other Email | Valid, real email address. | |
| Address | Address, Home, Work, Office, Other | Post Code must be alphanumeric, 4–10 characters; Country required. |
Common issues & solutions
| What you see | What it means | How to fix it |
|---|---|---|
| "Phone format should be 0XXXXXXXXX" | The number doesn't match a zero followed by nine digits, or it contains spaces. | Enter the number as 0XXXXXXXXX with no spaces. |
| The wrong email received the certificate | ActiveDonor sends to the default email. | Edit the correct email and tick Set as default e-mail address. |
| The new address didn't appear on an existing certificate | Certificates keep their issued details. | Tick Update all Section 18A with above address when saving, or use Update All Certificates with latest info on the Section 18A tab. |
| "Post code must contain only alphanumeric values." | The post code has spaces or symbols. | Use letters and digits only, 4–10 characters. |
| Email sending paused warning on the profile | The address bounced or was marked as spam, so sending is paused. | Update or correct the email address to resume sending. |
FAQ
My phone number won't save — why?
It must be a zero followed by nine digits with no spaces (0XXXXXXXXX). Remove spaces and any symbols and try again.
How do I set the default email or phone? Open the item's edit window (the pencil icon) and tick Set as default e-mail address or Set as default phone number. The default email gets emailed certificates and messages; the default address prints on certificates.
Can a donor have more than one phone or email? Yes — add as many as you like with + Phone / + E-mail, each with its own label. One of each is the default.
Why is there a WhatsApp icon next to a number?
Cellphone-labelled numbers starting with 0 or + get a WhatsApp shortcut on the profile so you can message the donor.